Details
of ROADCOW 
Okay. What we have here is a 1971 VW Westfalia Camper. I bought the bus with a dead engine in it for $500.00 from some friends. I put in a used, stock VW engine and enjoyed it for a year or so until that engine became more trouble than it was worth. I then had an 1800 cc engine built for it with all the "hot" stuff; Magnum 40 heads, dual 40 Weber carburetors, fully balanced, extractor exhaust, heavy duty alternator, chrome, the whole shot for an investment of around $3,000.00 dollars. That engine was fun but a lot of trouble and hard to keep in tune. I was constantly adjusting valves, tuning the carbs, and changing oil every 2,000 miles, trying to be good to it. It lasted 47,000 miles. The case cracked and the valve seats got pounded down into the heads (valve springs too stiff). The end of that idea!
By then I had met a guy over in Sacramento who had a 1971 VW bus with a Buick V6 in it! I went over and visited him and he showed me his set up and took me for a ride. Awesome!
I went back home and started thinking about what I wanted.
First, I wanted dependability. Second, I wanted good gas mileage. Also I didn't want to have to put in a stronger transmission and suspension to handle too much power like the guy in Sacramento had to do.
I decided on a 1981 Toyota Corolla 3TC engine. It is a proven engine. It is not too heavy. It should get reasonable gas mileage.
I ordered the adapter kit ($450.00) from Kennedy Engineered Products down in Palmdale, California,
Kennedy
Engineered Products
38830 17th Street East
Palmdale, California, 93550
1-661-272-1147
and I bought a Toyota engine for ($350.00); one of those engines that are sent here from Japan with 30,000 miles on them.
It took me about a month to put it all together.
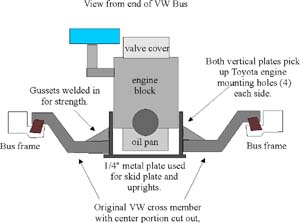 |
I had to fabricate new engine mounts. I kept the transverse engine mount that the original VW engine used but cut out the center part and welded in vertical plates to pick up the bolt pattern on the sides of the Toyota engine and tied it all back together with a 1/4 inch thick skid plate to protect the oil pan.
The Toyota engine bolts to the adapter plate, provided by Kennedy, and then I bolted that to my stock VW trans-axle. Kennedy also provides a flywheel. I had told them the type of engine I was planning to use and they took a stock VW flywheel, cut the center out of it and welded in a center that matches the Toyota engine crank "bolt pattern". That way the stock ring-gear engages the stock VW starter.
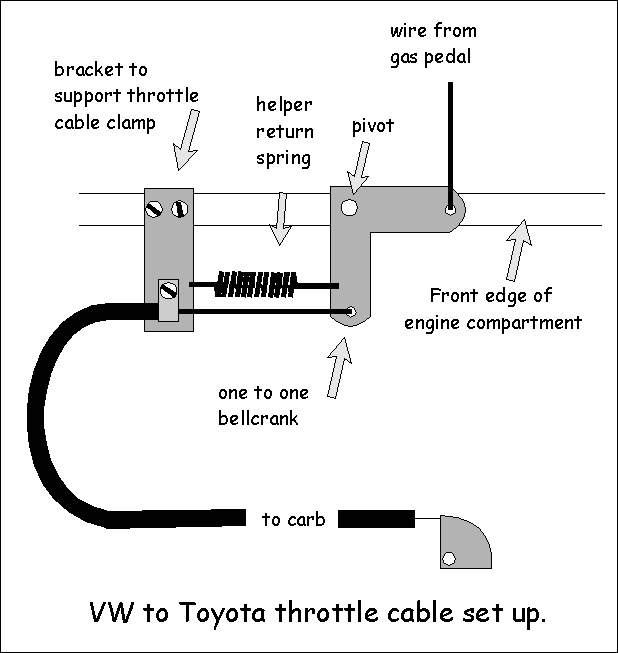
Then there was the throttle linkage to work out. I made a "one to one" bell-crank to convert "fore and aft" motion into "side to side" motion in order to connect it to the Toyota carburetor throttle properly.
 |
The biggest job was figuring out the radiator location and then doing it. The guy in Sacramento had mounted his radiator behind the engine. He removed the engine access door, spaced the bumper out a bit and fitted the radiator in the opening. The fan on the engine drew air in (backwards) through the radiator; also a lot of dirt and dust. I didn't like that. I do a lot of dirt road traveling.
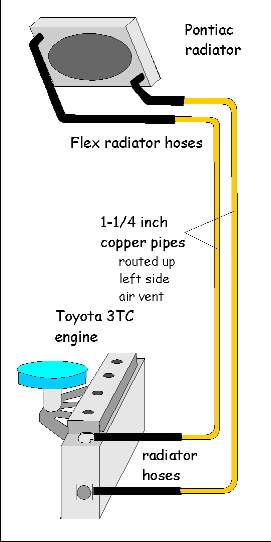
Kennedy recommended putting the radiator on the front of the bus and running long pipes up to it. I didn't like that. I have my spare tire on the front and also I figured a radiator in that position would be prone to damage. I wanted it up on top.
The guy at Kennedy said that a radiator located up there wouldn't get enough air flow because of the flat front shape of the bus. That it would cause the air flow to miss the radiator.
I decided to try it anyway.
I got a 1984 Pontiac Fiero 300 square inch radiator and welded up some brackets that would hold it in a 45 degree laid back position (to lower its overall height) and bolted that to the bus roof in the center of the roof rack at the back of the bus (my camper "pop-top" hinges at the front of the bus and tips up just ahead of the rear roof rack, making the pop top still usable). I ran two 1 1/4 inch copper pipes up from the right side of the engine compartment up through the inside wall of the air intake and out the roof and over to the radiator (sweat soldering 90 degree elbows at the bends) and connected them to the in and out fittings on the radiator with radiator flex hose. I did the same in the engine compartment using radiator hose to connect to the engine. The copper is held stationary to the bus. The radiator hoses allowed for engine movement and ease of connecting.
 |
The Pontiac radiator comes with a two speed electric fan already on it and I wired that up with two relays and a three position switch on the dashboard. Up is high speed, down is low speed and the center position is off. I installed four gauges in the bus dashboard; oil pressure, oil temperature, water temperature and a volt meter.
I then built a shroud or faring to go over the radiator. I shaped it out of slabs of two inch foam and installed a plastic grill, out of a Honda sedan, into the front as the air inlet. The back side just has an opening in it to let the air on out. Once it was all shaped the way I wanted it I covered it with fiberglass cloth and resin and then painted it to match the bus.
I have found the air flow through the shroud to the radiator to be sufficient. During normal driving on highways the water temperature gauge stays in the normal range. It is only during stop and go driving in cities or running the engine while parked that the temperature starts to go up. Then I flip the switch to turn on the fan, either Hi or Low depending. Out banging around in the desert on bad roads in first or second gear I will leave the fan on and usually Low Speed is enough to keep the engine happy.
An unexpected bonus was the discovery that I can store my solar shower bag in the area behind the radiator and at the end of the day, the water in the bag is ready to use for hot showers!
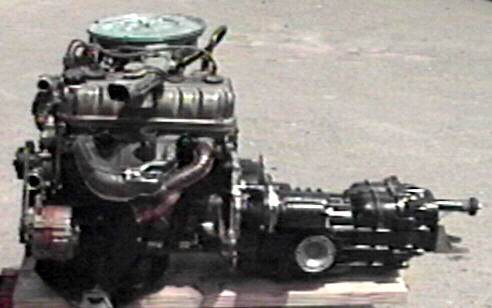
For access to the Toyota for valve settings, air cleaner replacement, checking the oil, etc. I cut the engine access door out of an old VW station wagon and then cut the same size hole in the floor above my engine and installed the access door. This way I can open the back bus door and then the access door under the mattress pad and get to the air cleaner, spark plugs, valves, dip-stick and add oil if necessary. It is actually fun to adjust the valves on the rare occasions when I decide it is time to do so. No more lying in the dirt on my back.

Here is a view of the Toyota engine with engine door open and sheet metal, bumper and rear tires removed. The engine does not protrude up into camper bed area.
One last project consideration was how to heat the bus. I used the heater core and fan out of a Honda sedan, mounted it in the engine compartment on the right side (I moved the battery over to the left side), and then ducted the output from the heater blower into the existing bus heater ducts just ahead of the trans-axle. From there the warm air goes through the regular bus heating system, defrosters, heat vents, etc. This is the only weak link in my whole setup. The Honda heater core/fan unit is a bit whimpy for the total bus area it has to heat. Some bigger heater unit would be better but I haven't gotten around to it.
I have put over 60,000 miles on the bus with the Toyota engine now. All I have had to do is change the oil and filter, which I usually do around every 4,000 miles.
On the road ROADCOW averages around 21 MPG. It's speed, when at 4,000 RPM in fourth gear, is about 65 miles per hour. In Nevada, heading across on Highway 50 one time, I had it up to 80 MPH for about three hours!
In low gear at 2,000 RPM it has enough torque to climb a stump!
Another feature I installed in ROADCOW is a second gas tank. The second tank is a duplicate of the tank already in the bus, 15 gallon capacity. I installed it in the space under the bench seat in the back of the bus. I cut the complete filler and door assembly out of another 1971 bus and cut a hole just ahead of the existing gas filler door in ROADCOW big enough to receive it, welded it in, bondo-ed it smooth and painted it to match. Then I bought some gas tank filler hose long enough to connect the filler to the tank under the seat.
I also took the dashboard gas gauge out of that other bus and installed it in my dashboard where the clock would normally reside. Now there is a gas gauge to the left AND right of my speedometer.
I connected the gas lines from both tanks to an electric solenoid valve selector and now, with a two position switch on the dashboard, I can select either tank "on the fly". Both gas gauges "read" all the time, showing the amount of gas remaining in them. One time I went 714 miles while in New Mexico but I was really on fumes when a station finally came over the horizon. Dual tanks have really come in handy down in Baja and also when rattling around in the East Mojave Wilderness.
Note: I did pull the rear suspension torsion bars and "cranked them up" a few notches in order to raise the rear of the bus a bit. The weight of the engine and extra gas tank did make it sag a few degrees. Adjusting the torsion bars brought the bus back up to level, no problem.
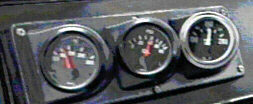 |
I have been asked about my gauges.
Okay, let's talk gauges! In
the image you will see my "cool" idea for mounting
three gauges.
I happened to run across a gauge holder at an auto parts
store. It was really designed to be used on a console
between the seats, sort of ala, 1965 GTO Pontiac, from the good
old days. It was just vacuum formed out of plastic or vinyl
and quite cheap. I bought it and hurried home.
With a bit of trimming of the base of it, to fit the curve, I mounted it on my glove box door in front of the passenger seat. The way the gauge holes were made it was just right for aiming the gauges towards the driver. Perfect!
In the hole closest to the driver I installed a oil temperature gauge. It is an electrical gauge and the sending unit I discovered to be the same size and thread as the oil drain plug on my Toyota engine!! I replaced the drain plug with the sending unit, attached the wire and made it long enough to reach the glove box.
The middle hole I installed a oil pressure gauge. It too is electrical. On the Toyota engine there is a oil pressure sending unit on the block below the intake manifold. I unscrewed it and replaced it with a "close nipple" and then added a pipe "T". Then I screwed the Toyota sending unit into one part of the "T", for the dash idiot light and screwed the oil pressure gauge sending unit into the other opening of the "T". I added length to the wire and run it up to the glove box.
The third opening in the gauge holder I installed a Water Temp gauge. I replaced the stock Toyota water temp sender with the after market water temp gauge sending unit that came with the gauge. (Note: The Toyota water temp sender is located on the casting that holds the thermostat on the front of the engine. If I remember right, I had to use a reducer.) I added enough wire to reach the glove box.
These three gauges have lights in them and so I found the wire that goes to the bus dash lights and spliced into it. Then I added a common ground wire to all three and attached that to a body screw I found under the dash (ground). Now when I turn on the dash lights the gauges light up too!
Here's the really cool part.
When I brought the bundle of wires up to the glove box I formed them into a long lazy "C", about four inches long, along the hinge line of the glove box door, I mounted one side of the bundle to the glove box top and the other side of the "C" to the glove box door; then routed them to their respective gauges. This way I can still open the glove box and use it normally without the wires interfering.
I also have a volt meter and a
tach. I mounted them where I could see them, the tach on
the dash and the volt meter below the radio. I like the
volt meter a lot. I just hooked it up to an "always
hot" wire
( B+) I found under the dash. It draws hardly any
current at all and so it is okay to have it hooked up that
way. When I hop in the bus I can instantly see what my
battery voltage is. After I start the engine I can see that
the voltage has increased indicating that the alternator is
working! When camped for the night and using interior
lights and radio I can glance up front and see what the battery
voltage is and know if I am getting into the danger zone of 11
volts or less. If so I know it is time to hang it up and go
to bed. If I get to 10 volts or less I know I am going to
have to push start in the morning as the battery will be too low
to crank the engine!!
January 1998. Another refinement to ROADCOW.
I have just completed installing a marine deep-cycle battery in the area under the jump seat behind the drivers seat. On the outside of the jump seat, facing the walk through area and within reach of the drivers seat, I installed a Perko battery selector switch. It has four positions to choose from. "Off", "Battery #1" (the stock battery), "All" (which selects power from both batteries) and "Battery #2" (the deep cycle battery).
I wired it all together using insulated #6 welding cable.
Works great! Now I can use the deep cycle battery while camping for running the 12 volt lights, the lap top computer, recharging the video camera batteries and grinding the coffee beans in the morning knowing that I still have a fully charged bus battery waiting in the wings to fire the engine and get us back on the road. I have also discovered that switching between batteries does not drop out the radio station "pre-sets". Cool!
September 1998
ROADCOW now has over 270,000 miles on it! The Toyota engine now has over 160,000 miles on it! I have replaced the water pump twice and the timing chain and gears once. I have gone through three or four alternators. The reason it eats alternators is because of the location of the alternator. It hangs down rather low on the engine and gets a lot of dirt and rain splash. The bearings take a beating. I should make some kind of shroud for it or possibly invest in a marine grade alternator to solve the problem but, rebuilt alternators are rather cheap so I probably won't get around to it!
Still, overall, I would call this conversion
"Trouble Free Motoring"!!
So, why is it painted like a Holstein cow?
Or, click below for:
 |
| Transmission
Time. Click here. |
E-mail Kennedy Engineered Products if you are interested in doing an engine swap.
Or visit their WebPage.